|
INTRODUCTION
Now you have the opportunity to play the same courses that have challenged golf's greatest
legends. World Class LEADERBOARD features three famous 18 hole golf courses and each
hole authentically reproduces the distance, traps, trees, rough and water hazards of:
St Andrews: The most revered course in golf. Doral Country Club: The Florida Blue Monster.
Cypress Creek: The Largest and the Finest. The fourth course, designed specifically for World
Class is the Gauntlet Country Club. Only those woh have mastered the best courses in the
world should expect to come close to par at The Gauntlet. World Class is a game of concentration,
skill and control. You will need to judge distance accurately in choosing your club
and power of your swing. Please read this completely to maximise your playing enjoyment.
OBJECT OF THE GAME
is to sink the ball into each hole by hitting the ball with a club the least number
of times possible. Avoid hazards that add extra "strokes" (hits with the club) to your
score. Low score wins.
LOADING INSTRUCTIONS C64 DISK
1. A security key has been provided. The disk is not protected and you may make back-up
copies for your archives. The security key must be plugged into the cassette port in
order for World Class to load properly. (Note: If you have an SX-64, you do not need
a security key).
2. Plug a joystick into port #2. (Rear port.)
3. Turn on the disk drive, monitor and the computer.
4. If you have a C-128 computer, hold down the Commodore key while you turn on the computer.
5. Type LOAD:"*",8,1 and press RETURN. If you have a MACH 5 or MACH 128 Fast Loading
cartridge simple type [LEFT ARROW]-key.
6. If you experience problems in loading this game, refer to the TROUBLE SHOOTING section
at the end of this instruction sheet.
C64 CASSETTE
1. Plug a joystick into port #2. (Rear port.)
2. Turn on the monitor and the computer. For CBM 128 hold down Commodore key when
turning on computer to enter 64K mode.
3. Determine the course you wish to play and rewind the cassette on the appropriate side.
4. Insert the rewound cassette. Press SHIFT and RUN/STOP keys together and press PLAY on
your cassette recorder. The relative course will then load.
5. A few moments after the Title Screen appears you will see the 'Select Player' screen.
At this point the game has finished loading.
Course A - Tape 1, Side 1
Course B - Tape 1, Side 2
Course C - Tape 2, Side 1
Course D - Tape 2, Side 2
6. You must leave PLAY button down while playing the game. If you have decided to play
the same course again or have aborted play in the middle of a round and wish to start
again, repeat the procedure as in 'Playing World Class Leader Board'. When the border starts
to flash, rewind the cassette and press PLAY.
PLAYING WORLD CLASS LEADERBOARD
If you selected to play the game, the next screen you will see is called the 'SELECT
PLAYER' screen. Most playing options are selected from the screen. (YOU MUST NOW INSERT THE
BACK SIDE OF THE PROGRAM DISK INTO THE DRIVE! DISK ONLY).
Step 1 - Course Selection (C64 Disk only)
When World Class is first loaded, it automatically brings in Course A, Cypress Creek.
If you want to play Course A, proceed to STEP 2 below.
To change to another course, hold down the SHIFT Key and press RETURN. The prompt
'INPUT COURSE' will appear. Enter the following letter for the course you wish to play:
A - Champions - Cypress Creek
B - Doral Country Club
C - St. Andrews
D - Gauntlet Country Club
E thru Z - Courses you have modified using the COURSE EDITOR.
If you select more than 18 holes (see Step 4), a prompt will appear at the end
of each 18 hole round, "NEW COURSE Y or N?". If a new course is desired, type Y
and input the letter (I.E. A,B,C,D...) for the new course. To play the same course
just completed, type N.
Step 2 - Select Number Of PLayers
World Class can accommodate up to four players, press 1, 2, 3 or 4.
Step 3 - Enter Player Names and Ability Levels
Type in the name for the 1st player (up to 8 characters) and press RETURN. Now
select the ability level for the 1st player. Each player can compete under
conditions that match his or her level of ability and experience. press K for
KIDS, A for AMATEUR, or P for PROFESSIONAL. A description of each level follows.
ABILITY - DESCRIPTION
Kids - This level has been designed so that younger children (4-8) can play the game.
When a shot is taken on this level, it will not hook or slice or be affected by the wind.
Kids level should not be considered the beginning as most of the elements of skill have
been eliminated.
Amateur - This can be considered the 'Beginning Level'. The ball when hit at this
level will not be affected by the wind, but will hook or slice.
Professional - Advanced Level - No restrictions on wind or hook and slice. Also, putting
is much more difficult.
After entering the NAME and ABILITY for the 1st player, do the same for each of the other players.
Note: When the ability level for the final player is selected, the game will begin.
Step 4 - Select Number Of Holes (C64 disk only)
World Class allows you to play from 18 to 72 holes with computerised scoring. To
select the number of holes press the appropriate FUNCTION KEY.
F1 - 18 Holes
F3 - 36 Holes
F5 - 54 Holes
F7 - 72 Holes
Select Type Of Shot
Two different types of shot can be used. The normal shot which is selected automatically
or the punch shot which is selected by pressing P. By pressing P a second time will
select a normal shot. A P will appear to the left of the club number whenever the
punch shot is selected. For a description of the punch shot, see 'Additional Features'.
GAME PLAY
Select a Club
Club selection is made by moving the joystick up or down. The following table
lists the approximate range of each golf club.
CLUB - SHORT - LONG
1W 1Wood: 156 - 271
3W 3Wood: 135 - 245
5W 5Wood: 128 - 234
1I 1Iron: 110 - 220
2I 2Iron: 100 - 210
3I 3Iron: 88 - 202
4I 4Iron: 70 - 189
5I 5Iron: 67 - 181
6I 6Iron: 55 - 169
7I 7Iron: 50 - 153
8I 8Iron: 36 - 138
9I 9Iron: 26 - 117
PW Pitching Wedge: 11 - 83
Putter*: 1" - 64"
* The computer automatically selects the putter for you when you are playing on the
green.
Aim your shot
Use the cursor to aim the direction of the flight of the ball. The cursor is
located several yards in front of the golfer. To control the cursor, move the
joystick right or left. If you are playing on the professional level, be sure
to check for wind effect.
Wind
(Professional level only) Wind can have a substantial effect on your golf shot.
To control it's effect, you need to learn to read the wind indicator on the
right side of the screen.
The vertical line indicates wind velocity. If this marker it tall, the wind
velocity could have a substantal effect on your shot. The shorter the vertical
stake, the less the wind will be a factor.
The ohter line indicates the direction the wind is blowing. The line acts as a
streamer. If the line is toward you, the wind is blowing toward you.
Swing the Club and Hit the Ball
Once you have selected your club and positioned the cursor to aim your shot, there
are only three more things to do before the ball is on its way; start the swing, set
the power, and snap your wrists to control hook or slice. All three are accomplished
during the swing sequence and require careful timing and concentration. The sequence can
be viewed by watching the golfer or the power/snap indicator.
Step 1
Start the swing by holding down the button.
Step 2
Set the power by releasing the button during the backswing.
Power is at maximum only at the top of the vbackswing. Releasing the button at the top
will set maximum power. Releasing the button just before or just after the top will reduce
the power slightly. Releasing the button well before or after the top will reduce the
power substantially.
The amount of power available during the backswing is shown on the upper left portion
of the power/snap indicator. When the button is released, the setting you have chosen will
be locked on the indicator.
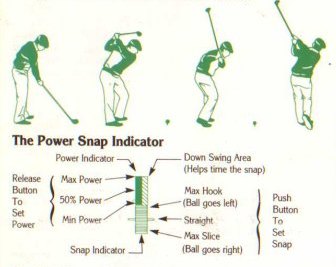
Step 3
Set the snap by pressing the button at or near contact with the ball. Snapping just as
the club hits the ball (or at the Tee Bar on the snap indicator) will produce a straight hit.
Snapping too soon will cause the ball to 'hook' (go left). Snapping too late will cause
the ball to 'slice' (go right). When the button is pressed, the point of the snap will
be locked on the indicator.
The swing sequence then is: Button - Release - Button
The best way to learn to hit the ball straight consistently is to practice on the driving range.
PUTTING
Once you are on the green, the computer will select the putter and remove the pin (the pole
with the flag). You cannot change clubs at this point as the putter is the only that can be
used on the green.
Putting on Kids and Amateur Levels
Use the cursor as before to aim the shot. The ball will start out in this direction. The
ball may break left or right depending on the slope of the green. To determine the amount and
direction of break, you must learn to read the slope indicator which appears on the green to
the left of the golfer.
Estimate the power needed by noting the distance to the hole. Press the button and hold it
until the power level is sufficient to reach the hole and then release it. The golfer will putt
automatically (Refer to the power indicator).

Putting on Professional Level
Putting is the same as on amateur with one exception, the power indicator will only visibly
reflect an accurate reading between 1' and 8'. At 8' the indicator will stop. Now it is up
to the golfer to estimate, mentally, how long he should hold the button in order to hit
the putt hard enough for the ball to reach the hole.
When the button is released, a marker will appear on the power indicator showing the
amount of power set. Example. On Pro Level, the golfer faces a straight flat 40' putt.
He presses the button and the indicator moves down and stops at 8'. The golfer continues to hold
the button until he thinks that the indicator has reached the 6th level of power of the 40'
mark and then he releases the button. When the button is released, a mark appears on the
indicator showing how much power the golfer actually used.
The best way to become a godd, consistent putter, is to practice on the practice putting green.
Putting is very easy and you should be able to do it with no problem. Just hold down
the button for a longer putt. The putting indicator shows the number of feet the ball
will travel on the side of it.
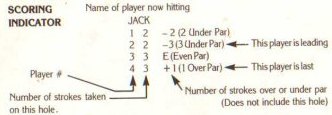
READING THE SCORE
The scoring indicator is displayed on the right of the screen. The indicator shows which
player is hitting, which players are in the hole, how many strokes each has taken this hole,
and how each player's total score compares to par for the course. Par presents the number of
strokes a good player should have used by the time he or she got to this hole. If you
score is '-5' for example, that means that you are 5 strokes under par or 5 strokes
less than the good player (which is good). An 'E' means you are even par or just equal
to the good player. A '+5' means you're 5 strokes over par. The par comparisons do not
reflect the scores for the current hole.
 RULES FOR SCORING
1. You receive 1 point (stroke) each time you hit the ball, regardless of the distance it
travels, from the time you tee off until you sink the ball in the hole.
RULES FOR SCORING
1. You receive 1 point (stroke) each time you hit the ball, regardless of the distance it
travels, from the time you tee off until you sink the ball in the hole.
2. You receive a distance penalty if you hit a ball into a water hazard.
3. Low score wins.
RULES OF THE GAME
1. PLAY AS IT LAYS. You must play the ball from the position in which it lands.
Exceptions are those that land in the water. (See below).
2. IN THE WATER. If your ball lands in a water hazard, you will see and hear a SPLASH.
You are penalised distance and the ball is automatically placed back at the point from
which you took your shot in the first place.
3. THE COMPUTER will take the same point of view as the player in determining the playability
of a ball that has come to rest. If, after moving up closer, the ball is found to be in
mud or water, the computer will place a small pad under the ball so the player can hit it.
Just consider it a 'lucky bounce'.
METHODS OF PLAY
1 Player
In this game you play alone, either against par or your own best score. You do NOT
play against the computer.
2 or More Player
1. After each player has taken his first shot on Hole 1, the player who is farthest away
from the hole shoots first, the player who is next farthest away shoots second, etc. If,
after your shot, you are still away (farthest from the hole), it is still your turn. You
continue until you are no longer away.
2. When a player has hit his ball and his turn os over, his ball will not appear on screen
again until it is his turn.
3. Decide the order in which players tee off when names are typed in at the beginning of
the game. This order will determine which score readout is yours throughout the game.
If you tee off second on Hole 1, the second radout will always indicate your score.
4. After a hole has been played, the player with the lowest score on that hole tees off
first on the next hole. This is called 'having the honour'. Since the score is kept on
each hole, you will be able to determine from it who has the honour. The computer also
keeps track and automatically changes the colour of the score readout for the player who
has the honour.
METHODS OF SCORING
1 Player Against Par
Compete against your best score and the golf course by trying to come in under par.
2 or More Players
MEDAP PLAY (Singles or Partners). Winner is determined by total of all strokes (points)
for entire game. Low score wins.
MATCH PLAY (Singles or Partners). Each individual hole is awarded to the player or team
with the lowest score on that hole. At game's end the player or team with the most holes
won takes the game.
BEST BALL (Partners only). Method of scoring for either Medal or Mtach Play. Best score
by either partner on a team is used as the team's score.
NOTE: If you decide on a Match Play or Best Ball game, you will need to keep track of
your scores on a separate sheet of paper. The computer does not keep score in this manner.
GAME TIPS
1. Be sure to CHECK YOUR CLUB - Check to make sure the golf club you want to use is displayed.
When you are making final direction adjustment, the golf club can sometimes change accidentally.
2. Always go to the Driving Range before starting. This allows you to get the correct timing on
your swing. (DISK ONLY)
3. Remember that the wind can make a substantial difference in your shot, especially short
irons and your pitching wedge.
4. Be extra careful in judging distance over water. If your ball falls short and lands
in the water, it'll cost you a distance penalty.
5. Learn to use the hook and slice. They can be used to your advantage on difficult shots
and when the wind is in play.
6. When using your pitching wdege, make sure you have read whether the distance to the hole
is in yards or feet.
ADDITIONAL FEATURES
PRACTICE PUTTING GREEN C64 DISK
Tu use the practice putting green, press G at the 'SELECT PLAYER' screen.
The level of putting is initially set to amatuer. To putt at professional level, enter
player 1 at professional when setting up game play. Then press / to abort game play.
Now press G to use the practice putting green. To exit, press /.
C64 CASSETTE
The level of putting is initially set to professional. To putt at amateur level, enter
driving range by pressing /, then enter putting green by pressing G, to exit press /.
DRIVING RANGE (DISK AND C64 CASSETTE ONLY
To get to the Driving Range press R when the SELECT PLAYER screen appears.
Exit by pressing /.
ABORT FEATURE
You can return to the SELECT PLAYER screen from almost any point in the game by pressing
/. This will cancel the game in progress.
REPLAY FEATURE (Disk only)
If you wish to start over at the 1st hole without changing names, etc...press P from the
SELECT PLAYER screen.
AUTOMATIC DEMO (Disk only)
If left unattended for one minute the computer will start the demo. You may start it
manually by pressing D from the SELECT PLAYER screen.
SCORECARD PRINTOUT (C64 Disk only)
At the end of a round, a hard copy printout is available. When PRINT SCORECARD appears,
type Y for yes and N for no.
HOLE LAYOUT (TOP VIEW)
You may obtain a "bird's eye view" of the current hole being played by pressing T. To
return to the game, press T.
SHOTS FROM SANDTRAPS AND ROUGH
Any shot taken from the rough will be dampened considerably. In order to get a good
shot out of a sandtrap, you must hit the shot within two bars of dead center
(straight shot) on the Power Snap Indicator. Woods are not a good choice in the sand.
PUNCH SHOT
A 'punch shot' is a low flying shot that will go under trees. This shot can also be used
to pitch and run on to the green. To use the 'punch shot', press P before hitting your ball.
The letter P will appear to the left of the club number. It will automatically cancel itself
after the shot. Since the shot requires some skill, it is a good idea to practice this
shot at the driving range.
COURSE EDITOR (C64 DISK ONLY)
The Course Editor allows you to create your own personalised golf courses by
modifying existing courses. You can choose from any of the 72 holes on this disk
and combine 18 of them in any order you wish. You can also change the style of
trees for each hole. Once you've created your own World Class course,
you can name it and save it to disk. Make minor modifications such as changing
trees types or combine 18 of the toughest holes on the disk for your own
"green monster" Course.
Before using the Course Editor, you must make a BACKUP copy of the original World Class
PROGRAM DISK. Since the PROGRAM DISK is write-protected, you cannot save your new courses
on it. You can use our BACKUP utility or your own system, if you have one. Remember to copy
both sides of the PROGRAM DISK. Label your copies World Class Front and World Class Back.
Using the Course Editor
Step 1
Choose EDIT COURSES from the OPTION screen.
Step 2
When the edit screen appears, insert the World Class Back copy that you have made.
Step 3
Load in an existing course that you wish to modify. This will be course A, B, C or D if
you have not yet saved any courses of your own. If you have created some of your own courses,
they will be loaded as course files E thru Z. The Course Editor will not allow you to save a
course file under letters A thru D. This is to protect the original World Class Courses.
Step 4
After an existing course is loaded, follow the instructions on the screen to make your
modifications to that course.
Step 5
Now save the course to disk. You must give the course a file a single letter identifier
(E thru Z), letters A thru D are not allowed. This means that you can have up to 22
personalized courses on a disk, each one identified by a letter, E thru Z. During game play,
you must enter this identifier when loading your course. (See the paragraph on COURSE
SELECTION in front of this manual.
Step 6
After you're finished using the editor. Insert the World Class Front disk into the
drive. Turn the computer OFF and then ON again and type LOAD"*",8,1 and press RETURN.
MAKING BACKUP COPIES (C64 DISK ONLY)
We encourage you to make duplicates of World Class LEADERBOARD and use the copies for
normal game play. If you keep the original in a safe place, you will always be able to
make new BACKUP copies to replace lost or damaged disks.
Creafully follow the instructions below:
1. You must have two new diskettes (they need not be formatted), one labelled World
Class Front and the other labelled World Class Back. Any existing informatiom on these
disks will be erased!
2. The computer will display four screens of information. Read each screen carefully.
3. At the bottom of the fourth screen you will be asked to select the FAST or SLOW backup
process. The FAST process will not work with some hardware configurations. If you are
unsure, select the SLOW process by pressing S, otherwise press F for FAST copy.
4. After a short delay, the computer will prompt you to insert the PROGRAM DISK (the
original disk). It should already be in the drive with the FRONT side up, so just press
RETURN.
5. After a period of time, the computer will prompt you to insert the BACKUP disk. Remove
the PROGRAM DISK and insert the BACKUP DISK labelled World Class Front and press RETURN.
6. The computer will prompt you to change disks several times during the copying process.
Continue to use FRONT of the PROGRAM DISK and the World Class Front disk until the computer
displays COPY COMPLETE. The World Class Front copy is now complete so remove it and set
it aside.
7. The computer is now ready to copy the BACK side of the PROGRAM DISK. If you wish to continue,
press RETURN.
8. Insert the PROGRAM DISK into the drive with the label side DOWN and press RETURN.
9. After a period of time, the computer will prompt you to insert the BACKUP DISK. Remove
the PROGRAM DISK and insert the BACKUP DISK labelled World Class Back and press RETURN.
10. Continue to exchange disks as you did before using the BACK of the PROGRAM DISK and
the World Class Back disk.
11. When the computer displays COPY COMPLETE you are finished.
12. Turn the computer OFF and then back ON again and type LOAD"*",8,1 then press RETURN.
NOTES ON USING THE BACKUP DISKS FOR GAME PLAY:
There is no information on the reverse side of either BACKUP disk. When instructions say to
insert the FRONT SIDE of the disk, you should insert the World Class Front disk instead.
When instructions say to insert the BACK SIDE of the disk you should insert the World Class
Back disk instead.
TROUBLE SHOOTING
IF YOUR SHOTS HAVE NO POWER
Either you are releasing the button to soon, too late, or not at all during the backswing.
Press the button to start the swing and hold it down until the club is at the top (highest
point) of the backswing and then release.
IF YOUR SHOTS CURVE BADLY LEFT OR RIGHT
You are not pressing the button just as the club hits the ball. Re-read the section on
'Swinging the Club and Hitting the Ball' and practice your timing on the NOVICE level.
IF YOUR PROGRAM FAILS TO LOAD
Remove the program disk, turn off the computer and disk drive, and try again. If the
program still fails to load try the slow load option.
LOST SECURITY KEY
C64 Disk - Replacement security keys are available for Ł5.00 each obtainable from US Gold
Ltd, Units 2/3 Holford Way, Holford, Birmingham B6 7AX.
COURSES
Champions Cypress Creek - Course A
This Texas course was designed in 1957 to be "The World's Largest and Finest".
Many of the major PGA Golf Tournaments have been played here including the US Open
and Ryder Cup Championships.
OUT 3628 yards - Par 36
IN 3604 yards - Par 35
TOTAL 7232 yards - Par 71
Record 64 by Bob Rosburg.
Doral Country Club - Course B
This Florida course, built in 1962, is nicknamed the Blue Monster because it
is spread acorss almost as much water as grass. Each year the Doral Ryder Open
is held here and past winners have included Jack Nicklaus, Lee Trevino, Ray Floyd,
Billy Casper and Tom Kite.
OUT 3405 yards - Par 36
IN 3540 yards - Par 36
TOTAL 6945 yards - Par 72
Record 64 by Jack Nicklaus.
St. Andrews - Course C
For centuries the eyes of golfers have turned toward St.Andrews. The Royal and
Ancient club was founded in 1754 and golf may have been played at St. Andrews
as early as 1552. One of its most unique features are its double greens. These
double greens are so huge that a player can face a length of putt undreamed of on
other courses. Through the years, St. Andrews has attracted more pilgrims than any
other golf course in the world.
OUT 3516 yards - Par 36
IN 3473 yards - Par 36
TOTAL 6989 yards - Par 72
Record 65 by Neil Coles.
Gauntlet Country Club - Course D
The Gauntlet Country Club is designed to be the ultimate World Class golf challenge.
Few great course combine such a searching trial of skill and courage as the Gauntlet, or
exact such a toll for loose play. The drive down each fairway is harrowing, calling
for extreme accuracy to stay out of trouble. The traps and water hazards are
numerous and their placement, perilous. Altogether, Gauntlet provides the greatest
test for all golfers' true skills and abilities.
OUT 3180 yards - Par 36
IN 3263 yards - Par 36
TOTAL 6443 yards - Par 72
|