|
INTRODUCTION
Once you have selected the team names, you must decide on the length of the quarters. The maximum
amount of time allowed is 15 minutes. To change the time clock, pull the joystick DOWN (press
the , key) to reduce the time; push the joystick UP (press the I key) to increase the time.
When you have selected the desired quarter time length, press the FIRE button (SPACE BAR).
Now you see the Scoreboard, The scoreboard indicateds the team names, the quarter, down,
yards to go, ball position and time outs remaining.
STARTING PLAY
Kick-Off
* Kick-off to begin play. The team which has the possession of the ball should press the
FIRE button (SPACE BAR) to call up the Main Menu screen.
* The Main Menu is made up of these options:
"Clock" - Time-out: there are three time-outs per half
"10" - Go to Scoreboard
"Disk" - Load or Save the Game,. switch from PLAY GAME or CHALKBOARD or vice versa.
"EXIT" - Exit.
* Using the joystick (pressing the J or L key), select the EXIT icon toadvance to the
Play Selection screen. When the Kick-off icon appears, press the FIRE button (SPACE BAR).
* Select the direction of the Kick: LEFT, MIDDLE, or RIGHT, then press the FIRE button
(SPACE BAR).
* Now a menu of plays for the type of Kick selected will appear. Use the joystick (press the
I and , keys) to scroll UP and DOWN the list of plays. Select a play with the joystick (press
the J or L key), and press the FIRE button (SPACE BAR). The play will be diagrammed on the
screen.
* If you wish to use the diagrammed play, select the OK icon with the joystick (press the J or
L key). If you would rather see another play, select the GARBAGE CAN icon to make a new
selection. If you wish to design your own play, refer to the CHALKBOARD section in this manual.
* If you are playing with two players, your opponent will now select a defensive play. Follow the
same selection sequence used in making the offensive play selection. For one player game play,
you also select the defensive play. (Now is the time to design or run through various plays -
before you face your opponent.)
Note: In a two player game, players should not observe the other player making his or her play
selections.
* After you have chosen both the offensive and defensive play formations, use the joystick (
press the J or L key) to select the OK icon to take you to the Kick-off screen.
* To initiate the Kick-off, the receiving team presses one of the numbered keys from 0 to 8.
These keys correspond to the speed in which the Kick-off is played. 0 is fastest; 8 is slowest.
Press 9 for a stop-action sequence, and press the SPACE BAR (Button 2 on the joystick) to
advance each frame. After selecting the speed of play, the Kick-off will automatically begin.
Move the Kick-off receiver downfield to gain a good position. Following the Kick-off. Press the
C= (ESC) key, and the Scoreboard will appear.
Play Selection
* Press the FIRE button (SPACE BAR) for the Main Menu. Select EXIT to advance to the
CHOOSE PLAY TYPE menu. Use the joystick (press the J or L key) to select the following
offensive options: Run, Pass, Field Goal, Punt and Exit.
* You will encounter a series of three of four simple menus asking for different types of
play selections. Here are the choices you will be making to select the various types of
plays:
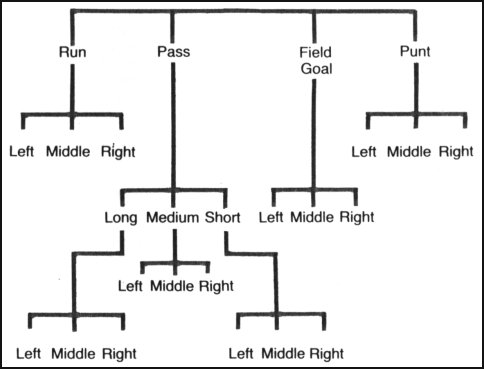
* The Offensive Players selects first. Select the type of play you want by moving the
joystick (pressing the I, J, L and , keys). Press the FIRE button (SPACE BAR).
* The nexy menu asks for the play direction. If you want the play to go LEFT, up the
MIDDLE, or RIGHT, make your selection and press the FIRE button (SPACE BAR).
* Now you will be looking at a list of plays from your Playbook. Use the joystick (the I,
J, L and , keys) to scroll UP and DOWN the list of plays. You can scroll beyond the
screen to view all the plays in the category. Press the FIRE button (SPACE BAR) to
make your selection.
* The play will be diagrammed on the screen. Study the route of the primary ball carrier.
In the Commodore 64/128, the primary bal carrier is indicated with a black line ending
in a square. The secondary ball carrier is indicated with a black line ending in a diamond.
In the Apple version, the primary ball carrier is indicated with a white line ending in
a square. The secondary ball carrier is indicated with a white line ending in a diamond.
Note: The screen displays 22 plays at a time, but the play list can actually hold up to
120 plays.
* Now the Defensive Player selects a play from the menu to try and contain the offense. Once
the Defense has selected a play, choose the OK icon.
* The Offensive selects the speed at which the play is run. It is based on a scale of
0 (fastest) to 8 (slowest). Press the numbered key for the speed you want, and the action
begins. For a freeze frame, stop-action sequence, press the 9 key. The Defensive player
can then press the SPACE BAR (Button 2 on the joystick) to advance the game step by step.
* When the ball is snapped, you will see "Received Snap" at the top of the screen. The
quarterback will follow his assigned route automatically until you decide to handoff, pass
or change the preassigned play.
* When your running back is in position for the handoff, you'll hear a "beep" from the
computer. Press the FIRE button (SPACE BAR). Move the joystick away from the offensive
line (press the appropriate directional keyboard controls) for an outside handoff. If you
want to make an inside handoff, move the joystick towards the offensive line
(press the appropriate directional keyboard controls). Once the handoff has been made, control
shifts to the ball carrier. Use your joystick (press the appropriate directional keyboard controls)
to move him downfield.
* After each play is completed, press C= (ESC) key, to return to the Scoreboard.
* At any time during PLAY GAME, you can EXIT to the Main Menu to call a time out. Using the
joystick (pressing the J or L key), select the TIME OUT icon. This allows you to stop the
clock and save huddle time. Press the FIRE button (SPACE bar). There are three time-outs
per half.
PLAYING THE GAME
In THE WORLD'S GREATEST FOOTBALL GAME, you can survey the field action from three different,
simultaneous view points. With the multi-screen perspectives, you benefit from sideline,
overhead and close-up views. Press the W key to toggle between single and multi-screen views.
Sideline View
On the right side of the screen is your original sideline view. It allows you to see
both teams at the line of scrimmage before and during the play.
Overhead View
On the lower left side of the screen is the overhead view of the entire field. It allows
you to survey all 22 players moving on the field, highlighting the key offensive and defensive
players and the position of the ball.
Overhead Close-up View
In the upper left corner of the screen is an overhead close-up view, with a + sign marking
the position of the ball carrier, and the X's and O's marking the positions of the
offensive and defensive players in the immediate area. The close-up view allows you to view the
action from above, watch the offensive and defensive players execute their routes, and to
see the best "holes" to take advantage of.
The quarterback stand out from the other players in a white uniform with a black helmet
(in the apple version, the quarterback is indicated by a green square. The Receiver
will be indicated by an orange square). The ball is snapped, and play begins. Use your joystick
(appropriate directional keyboard controls) to scramble. When your Primary receiver, or
Secondary, if selected, is in position downfield, you will hear a "tone". To release the
ball, press the FIRE button (SPACE BAR) and then move the joystick LEFT or RIGHT (press the
J or L key).
If there is danger of the quarterback getting sacked, you can release the ball early.
Move the receiver into position to catch the ball. To release the ball, press the FIRE
button (SPACE BAR).
Game play automatically defaults to the Primary receiver. Commodore users press and hold
the FIRE button and pull the joystick DOWN to select the Secondary receiver. To switch back
to the Primary receiver, press and hold the FIRE button and push the joystick UP. Apple
users press P or S to select the Primary and Secondary receiver whether you are using the
joystick or the keyboard. The letter P or S will appear in the top left-hand corner of the
screen. If neither receiver is open, you can elect to keep the ball and run downfield.
Afther the ball is released, control switches from the quarterback to the selected receiver.
The receiver stands out in a white uniform. As you follow the flight of the ball, use the
joystick (appropriate directional keyboard controls) to move the receiver into position. He has
to be within arm's reach of the ball to make the catch. Once the ball is released, the
defensive secondary moves toward the ball and closes in on the ball carrier. If the defense
comes into contact with the ball carrier, the carrier is tackled and the play is over.
The defense can also switch players. The game automatically defaults to the Linebacker.
Commodore users press and hold the FIRE button and pull the joystick DOWM for a Safety. Push
the joystick UP to switch back to a Linebacker. Apple users press Button 1 on the joystick when
using the joystick or the SPACE BAR when using the keyboard, to toggle between the Safety and
the Linebacker (the Linebacker and Safety will be indicated by a purple square). The letter
S or L will appear in the top right-hand corner of the screen. Control of the Linebacker is
generally desired on a running play. Control of a Safety is generally desired on a pass play.
As each play develops, you should be able to determine if a play is a pass or run and this
will help you decide whether to select a Linebacker or Safety.
Press the C= (ESC) key after each play to return to the scoreboard. If you make a touchdown,
you must kick for the extra point.
The Punt or Field Goal
To try a field goal or punt, select the corresponding icons from the Play Selection menu. If
you do nothing after the snap, the ball will be kicked automatically. But, if you want to
fake out your opponent with an option play, use the joystick to control the ball carrier
in executing a run or pass.
On a punt return, the receiving team uses the joystick or the keyboard to control the
movements of the punt returner - in a white uniform. To call a fair catch, press the FIRE
button (SPACE BAR.)
Save Game
Return to the Main Menu. Select the DISK icon. Now select the SAVE GAME option and the
game is saved.
Load Game
Return to the Main Menu. Select the DISK icon. Now select the LOAD GAME option and the
previously saved game is loaded.
Restore/Reset
At any time during the PLAY GAME, you can press the RESTORE (RESET) key to return to the
PRE-GAME section of THE WORLD'S GREATEST FOOTBALL GAME.
Note: Whenever you switch from CHALKBOARD to PLAY GAME or vice versa, be sure to
insert SIDE 1 of the disk and press RETURN.
THE CHALKBOARD
It's been said that football is 85 percent mental and 15 percent physical. And most of that
mental work - designing and calling the right play, knowing who to throw to and who to block -
gets done if front of the CHALKBOARD. That's where you, as Coach, can put together your
own Playbook with enough formations, plays and options to keep your opponent off balance.
Working with the CHALKBOARD, you can design blocking and passing patterns for each play -
plays you'll be calling as part of your game plan.
Before you start designing your plays, study the illustrations provided in the
Playbook. You'll see a variety of offensive and defensive formations and routes.
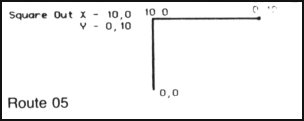
There are 87 possible offensive receiver routes, each identified by a number in the lower
lefthand corner. The X and Y coordinates in each pattern represent the forward and lateral
movement of the player on the field, with 0,0 being the starting point of each receiver.
Thus, in a Square Out - Route 05, the receiver runs straight out 10 yards, then cuts to his
right 10 yards to catch the ball.
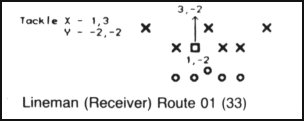
The boxes you see in the blocking routes represent the first turn point in the route,
and the arrow represents the end point. The X and Y coordinates represents the end point.
The X and Y coordinates represent forward and lateral movement, with 0,0 being the position
of the ball on the line. In Blocking Route - 01, for example, the tackle moves one yard
forward and two yards to the left of the ball then continues straight ahead 3 yards.
Entering the CHALKBOARD from the PLAY GAME section is easy. Select the EXIT icon from
the GAME OPTION menu to return to the Main Menu. Using the joystick (pressing the J or L
key), select the DISK icon and press the FIRE button (SPACE BAR).
This takes you to the SAVE/LOAD menu. If you want to save the present game, select
SAVE GAME and the game will be saved. Then you can go on to the CHALKBOARD and return
to the game after you have designed your plays.
Select the CHALKBOARD icon from the SAVE/LOAD menu. Press the FIRE button (SPACE BAR).
Remove the disk from the disk drive, turn it over and insert it with the SIDE 1 label
facing up.
CHALKBOARD menu is made up ox six options. These options are:
* Views a play from the Play disk menu.
* To add/design a play.
* To change a play.
* To delete a play.
* To initialize or format a blank disk to store your plays.
* Return to PLAY GAME.
Selecting any of the first four icons will prompt you to choose Offense (O's) or Defense (X's).
Then you'll be asked to select Run, Pass, Field Goal, and Punt. Next choose Left, Right,
and Middle. The last screen is the Play Book.
Note: On certain apple computers you must first intialize your disk using the Init Hello
command, and the reinitialize with the initialize (disk icon) option on the Chalkboard menu.
TO VIEW A PLAY
To view saved plays, select the VIEW icon. Select the play you want to view. Then pull the
joystick DOWN (press the , key) to scroll down the list, push the joystick UP (press the I
key) to scroll up the list, and LEFT or RIGHT (press the J and L keys) to move to the next
column of plays. Each play name is highlighted as you scroll past it. Press the FIRE
button (SPACE BAR) to select the play you want.
Note: If there are no plays available in a particular category you've selected, "NO PLAYS
ON FILE" will appear at the top of the screen. Select EXIT to return to the CHALKBOARD menu.
The play will then be diagrammed on your screen. Black lines (white lines on Apple) ending
in a square represent the Primary receiver route and black lines (white lines on the Apple)
ending in a diamond represent the Secondary receiver route. Blue lines (orange lines on
the Apple) represent the routes of the other players.
If you have a printer, you can print out the diagram of the new plays you design - or of
the entire class of plays by selecting the print option you want.
* Exit the print option.
* Print the diagram.
* Print the entire class of plays.
TO ADD/DESIGN A PLAY
To design your own plays, select the + icon. Select the type of play you want.
Insert a blank, initialized disk, or the PLAY disk (SIDE 2) and press the FIRE button
(SPACE BAR). Then select the appropriate options on each menu.
Note: It is recommended that each player save plays on separate disks.
Choosing Formations
You'll then be asked to choose an offensive formation. Each of the 27 possible formations is
displayed, with formation numbers displayed in the lower left corner of the screen. To advance
to the next formation, select the "Arrow Down" icon and press the FIRE button (SPACE BAR).
To go to previous formations, select the "Arrow Up" icon.
When you are diagramming plays on the CHALKBOARD, the yardage lines on your screen are marked
every 10 yards.
To see the preassigned routes for players in each formation, move the cursor to the
ROUTES x icon and press the FIRE button (SPACE BAR).
When you've found the formation you want, move the cursor to OK and press the FIRE
button (SPACE BAR).
Selecting Players
Once you've chosen a formation, you'll be asked to select the players you want to assign
a route to. A circle will appear around a player in your formation, and his position and
number will be displayed in the lower corners of the screen. Use the "Arrow Up" and "Arrow
Down" icons and press the FIRE button (SPACE BAR) to move the circle up and down the formation.
To select a player, set the circle around the position within the formation. Then move
the cursor to the OK option and press the FIRE button (SPACE BAR).
Selecting Routes
Next you'll be asked to choose a Route for that player. Use the "Arrow Up" and "Arrow Down"
icons and press the FIRE button (SPACE BAR) to flip through 87 possible receiver routes. The
screen display will tell you what formation you're in, which player you're assigning a route
to, and the route number you're currently selecting.
If you're assigning routes to a running back, and want to see how a cross pattern, for
example, Route 03, will integrate with the routes that the rest of the team players will
be running, select the ROUTES x icon and press the FIRE button (SPACE BAR). The running
back's cross pattern will be highlighted with a black line, (white line), and all other
offensive routes will be shown in blue lines (orange lines).
If you want to reverse the displayed routes, select the REVERSE icon "REV". The route number
of that pattern will be displayed in green lettering on a black background (black lettering
on a white background) on the bottom right-hand side of the screen, until you select the REVERSE
icon "RVS" again.
When you're ready to assign a route to that player, move the cursor to the EXIT icon and
press the FIRE button (SPACE BAR).
You'll then be asked to choose the next player you want to assign a route to. Repeat the
process as above.
Note: To move ahead to the next menu, select OK. Select EXIT to return to the previous
menu.
You don't have to select a route for each player. If you want to stay with a player's
preassigned route, just skip to the next player in the "Choose Player" screen.
Primary and Secondary Player Selection
When you're satisfied with the route for each player, press the FIRE button (SPACE BAR)
to EXIT from the last "Choose Player" screen. Repeat the EXIT routine until you're asked
to choose a primary ball carrier for offensive plays. Each eligible receiver in your formation
will then be circled in turn, and his route will be displayed. Use the FIRE button (SPACE BAR)
to select a Primary receiver, move the cursor to OK, and press the FIRE button (SPACE BAR).
The Primary receiver's route will then be highlighted in a dark line ending in a black square.
You must then select a secondary receiver the same way. His route will be shown ending
in a diamond.
Name a Play/Save a Play
Once you've selected a formation, routes and ball carriers, you need to name the play.
Using the keyboard, enter the play name.
You can name your play with any combination of letters and numbers up to 15 characters.
It's a good idea to include information in the play name that will cue you as to the
nature of the play. For example, "F1 Trap Left RB" tells you the formation you are using
(#1), the kind of play, and the Primary ball carrier or running back. In a defensive play
"322 MAN TO MAN" indicates three players starting on the line of scrimmage, two players
starting one yard off the line, and two players two yards off the line, with the rest of the
players in the backfield.
TO CHANGE A PLAY
The CHANGE icon on the CHALKBOARD menu allows you to change a play you've already
designed. Select the play you want to change.
You'll then be asked whether you want to Rename "NAME" or Redesign "REDO" the play. Press
the FIRE button (SPACE BAR) and you'll see the play list for that type of play. Use the
cursor to select the play you want to change.
If you just want to Rename a play, you'll be given a screen to rename. Now you can SAVE
the play as before.
If you want to Redesign the play, you'll go through the same sequence you followed in the
ADD play process - choosing a new formation, player routes and ball carriers. Remember that
players will keep the same routes you assigned them in your original play, unless you change
a particular player's route. Save your play as before.
TO DELETE A PLAY
The DELETE icon allows you to remove plays from the PLAYBOOK. Flip through the option menus
to find the play you want to delete. Press the FIRE button (SPACE BAR) for your selection.
At the same time you delete a play from the Playbook, you create space to add a new plays.
When you're satisfied with the variety of plays you've designed on the CHALKBOARD, it's
time to suit up and return to the field. To get from the CHALKBOARD to the PLAY GAME, select
the PLAY GAME icon from the CHALKBOARD menu. This will bring you back to the ENTER TEAM NAME
screen. Using the keyboard, enter your team name and press RETURN. To continue on in PLAY
GAME, follow the instructions in the PRE-GAME selection.
Note: At any time during the CHALKBOARD, you can press the RESTORE (RESET) key to
return to the main CHALKBOARD menu.
HELPFUL HINTS
* Moving the quarterback before the ball is snapped will result in a fumble. Look
for "Received Snap" at the top of the screen to start movement.
* On running plays, you will hear a "tone" when the designated player is in position to
take a hand-off. For example, you can run a halfback option, with your halfback taking the
handoff and passing to a receiver downfield.
* When positioning a player to catch a pass or lateral, move them toward the shadow cast by
the football. The shadow indicates the ball's relative position to the ground. Players must
be within arm's reach of the ball to take the pass.
* If the ball has not passed the line of scrimmage, players will stay at the endpoints of
their routes. Defensive players will revert to man-to-man coverage.
* If you have not assigned a route to a defensive player, he'll play man-to-man. Linemen
will rush the quarterback, and backs will move toward the ball.
* Offensive backs may have a hard time shaking man-to-man coverage. One technique is to
jiggle the joystick when you're controlling the receiver. (There are no corresponding
keyboard controls).
* Each player is programmed with his own logic for his position. For instance, a tight
end may pick up the blitz and stay on the line to block, rather than run his route.
* Running backs are programmed with "the John Riggins factor" - the ability to overpower
tacklers in the open field or at the line of scrimmage.
* Quaterbacks are programmed with a "tiring factor" - if you try too many quaterback
sneaks or end runs, he'll tire and become less effective.
* Offensive and defensive backs are fast, but less effective blockers. Linemen are slow,
but strong.
* Plays can be altered by you on the field. So, if you call a long, left passing play, and
then decide to run the ball up the middle, you can control the action.
* Using the joystick (appropriate directional keyboard controls), movement is keyed to the
sideline view of the game. Moving the joystick LEFT or RIGHT (press the J or L key) will
move your player left or right on the field. If you're keying your moves to the overhead view
of the field, you may want to rotate the joystick one quarter turn to the right, so that player
movement on the overhead screen corresponds to the movement of the joystick.
* When selecting the direction of the Play type, remember that the direction is from
each player's point of view on the field. Left for you is right for the opposition.
QUICK REFERENCE CARD
EXIT:
Select the EXIT option from any menu you're in to cancel a selection and start again.
RESUME PLAT AFTER A DOWN:
After completing each down, press the C= (ESC) key to return to the Scoreboard and
select a new play.
DISPLAY WINDOWS:
Press W to toggle back and forth between 3 screen views and 1 screen sideline view of
the playing field.
SPEED CONTROL:
Press any numbered key from 0 (fastest) to 8 (slowest) for the play speed you want. Press
9 for a stop-action sequence, and use the SPACE BAR (Button 2 on the joystick), to
advance each frame.
SWITCH CONTROL FROM PRIMARY TO SECONDARY RECEIVER:
Commodore users, press and hold the FIRE button and pull the joystick DOWN. Push the
joystick UP to switch back to Primary. Apple users press P or S to select the Primary
or Secondary Receiver when using joystick or keyboard.
SWITCH CONTROL FROM SAFETY TO LINEBACKER:
Commodore users, press and hold the FIRE button and pull the joystick DOWN. Push the
joystick UP to switch back to the SAFETY. Apple users press the SPACE BAR when using
the keyboard or Button 1 on the joystick when using the joystick to toggle between
the Linebacker and Safety.
OUTSIDE HANDOFF:
Move the joystick away from the offensive line (press the appropriate directional keyboard
controls) for an outside handoff.
INSIDE HANDOFF:
Move the joystick toward the offensive line (press the appropriate directional keyboard
controls) for an inside handoff.
SAVE A PLAY IN THE PLAYBOOK:
Design a play using the + icon in the CHALKBOARD. When you reach the Enter Play Name menu,
type in a play name and press the FIRE button (SPACE BAR).
SAVE A GAME:
Return to the Main Menu. Select the DISK icon. Now select the SAVE GAME option and the
game is saved.
LOAD A GAME:
Return to the Main Menu. Select the DISK icon. Now select the LOAD GAME option and the
game will load.
RESTORE WITHIN THE CHALKBOARD:
Press the RESTORE (RESET) key at any time to return to the main CHALKBOARD menu.
RESTORE WITHIN PLAY GAME:
Press the RESTORE (RESET) key at any time to return to the main PLAY GAME menu.
Note: All joysticks controls refer to both the Commodore and Apple. Keyboard controls for the
Apple are in parentheses.
|